If you have clarified your goals and vision and developed a solid understanding of the site, designing should come together easily. This step examines how the elements you’ve previously identified fit into the landscape.
When you start exploring layouts, the goal is to do this quickly and iteratively, trying out multiple ideas. Hand drawing is often the most effective tool. You can utilize trace paper, use multiple copies of your base map, or use drawing software. Create rough drawings that illustrate the locations and layouts for the design. These drawings do not need to be visually appealing or accurate; it is about exploring ideas.
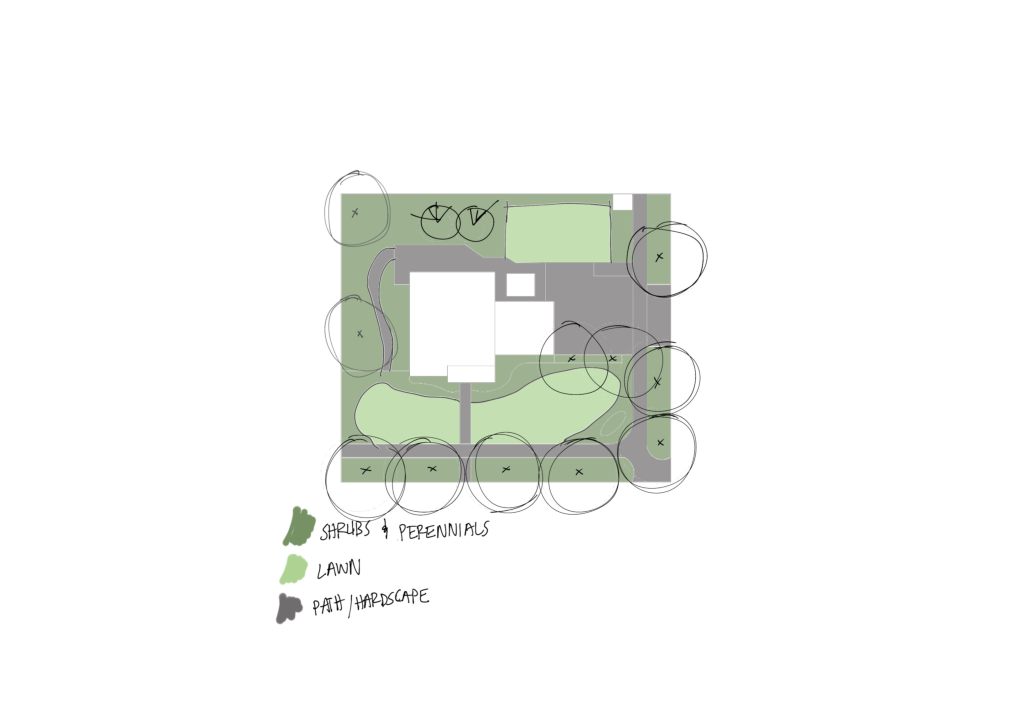
A rough concept plan is sometimes called a bubble diagram because circles are used to represent different areas and their functions. Circles, blobs, scribbles, or more detailed drawings can be used for use areas. Arrows or lines are useful for traffic patterns and pathways. Color can also be a useful tool.
If you don’t want to draw, you can design it out in the actual yard using spray paint, twine, flags, and stakes. Combining drawing and on-site layout can yield great results. Staking it outside helps you imagine and adjust the design. Drawings create a better record and allow clarity of overall form.
The goal of this step is to determine where things should be and how the landscape works together. Read this article in its entirety before you begin your concept design to get a clear view of the process.
Pattern to Follow
Design can sometimes be messy and iterative, but it’s also beneficial to have a pattern to follow to be more effective. Try placing things in this order:
1. Place Main Components
This connects directly to your goals and vision that you created earlier. Find a place for what is on your list. Match the feature to the site requirements as much as possible. Include the following:
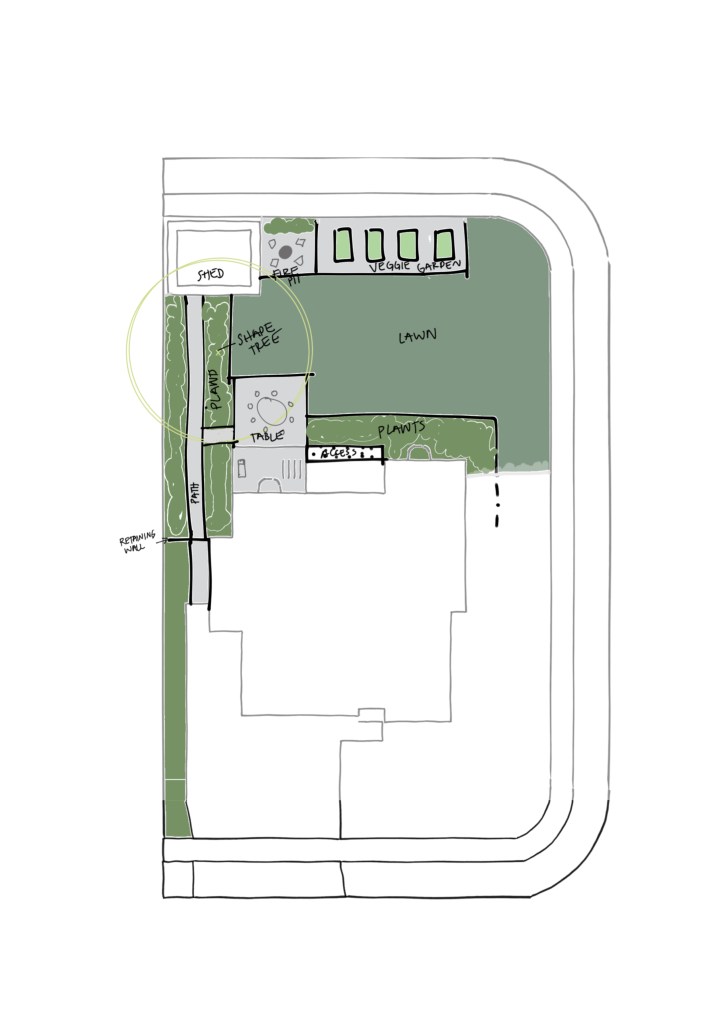
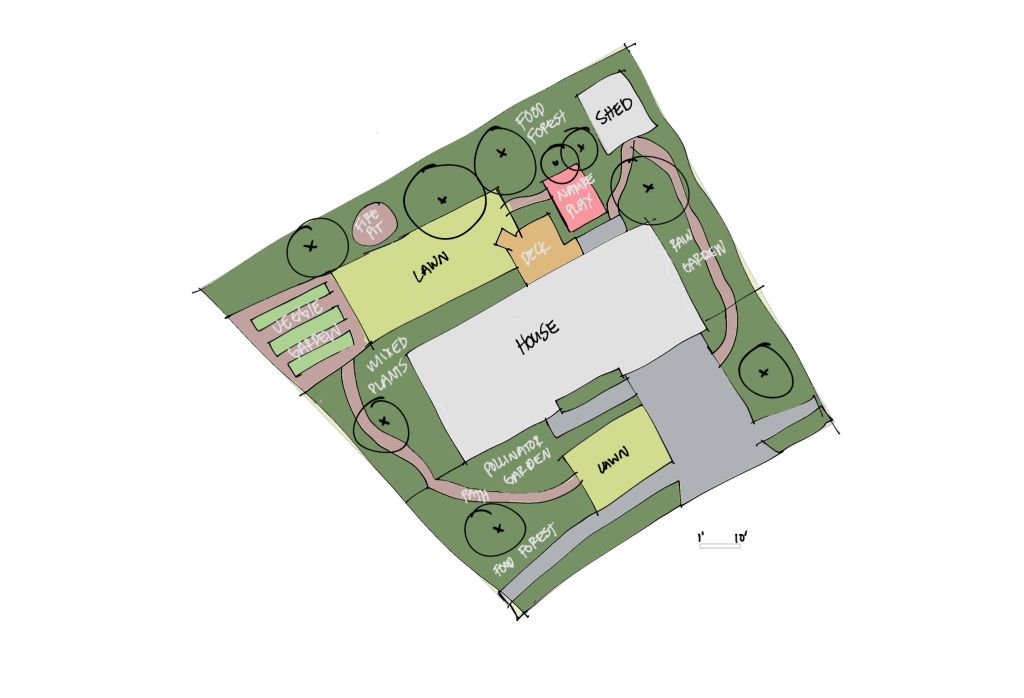
- Use Areas: places for activities, plants, storage, or other uses.
- Structures: any large structures like sheds, outbuildings, playgrounds, pools, patios, pergolas, chicken coops, fences, and decks.
2. Site Modification
After placing the main elements, focus on how they relate to the site. You may need to modify the site to support your design. Modifications can include adding or removing shade, providing windbreaks, screening, highlighting views, or changing the soil or grade. Use your site analysis to determine what changes are needed.
Grading includes dealing with the slope and drainage. Ideally, you want to minimize grading changes, but you might need to adjust the grade to accommodate your desired elements. Many elements will require pretty flat areas, and some will work well on slopes. You also want to ensure drainage away from structures to prevent erosion and flooding.
Other grading considerations include:
- Retaining walls to manage slopes
- Swales, drains, and rain gardens for drainage
- Landforms for visual interest, like terracing and berms
- Slope adjustments to accommodate uses and prevent erosion
Specific grading needs will be dealt with in the next stage. If you have significant grading challenges, it is beneficial to work with a landscape architect.
3. Connection
Connection includes providing access and circulation. Plan pathways, gates, and driving access. Some access might be informal, but it is still important to include. For example, you might want to maintain vehicular access across a lawn rather than creating a driveway.
More frequent use, like entryways, generally requires a wider path with stable material. Paths with occasional use can be more flexible, often simply devoid of things that would impede traffic.
4. Edges & Groundplane
Define transitions between areas. Edges have a shape and a material, and some transitions need defined edging, such as the edging between the lawn and planting beds that prevents the lawn from spreading. There could be gaps between areas, and this step also allows you to fill in these gaps.
Define the groundplace, which is what covers the ground in each area. Categories include:
- Structures and hardscape: built elements, like a building or path.
- Mulched planted areas: trees, shrubs, perennials, and annuals with mulch between plants. Mulch can also be used as access/pathways.
- Densely planted areas: meadows, lawns, and groundcovers where plants cover the entire ground.
5. Add Supporting Components
These include smaller components like arbors, raised garden beds, water features, and play equipment. Also include trees and large shrubs that form foundational planting that impacts the landscape around them. Carefully place them in the landscape to support your garden vision.
Design Considerations
As you design, try to maintain function, promote sustainability, and create a place that is beautiful. The following considerations will help you.
Principles of Design
Good design follows certain principles, like balance, emphasis, contrast, rhythm, and unity. These principles help organize a landscape and make it feel intentional and beautiful. Provide focus by prioritizing important features. Create balance and rhythm through consistent flow, and unity through repetition.
Fit Components to the Site
When you place components on the plan, try to find spaces where the least amount of site modification is needed. Use the work you did in the site analysis to match site conditions to the requirements of site components.
Create Zones Based on Use
Group things based on how often they are used or maintained. Put things that are frequently used closer to the home for easy access. For example, you might want to put a play area and herb garden close to the house because they are used multiple times per day. Ornamental and native plants that don’t need frequent care can be placed far from the home.
Zone things together that need similar maintenance, in both frequency and type of care. For example, you could place a chicken coop next to a kitchen garden. You gather eggs and the harvest at the same time, and excess produce goes to the chicken.
Don’t Default to Lawn
Treat the lawn as a deliberate design element with a dedicated shape and size instead of using it as a filler. Undefined areas are better filled with mixed planting that mimics what would occur in the site naturally. Designing lawns intentionally and filling in with natural patterns leads to landscapes that are more sustainable, lower-maintenance, and responsive to the site.
Sizing
Detailed sizing is not needed for this stage, but ensure there is enough room for your intended elements. Consider things like what you need to store, how you want to use a space, and what your priority is. Some minimum sizes are listed below.
- Patios/Deck: 10’x10′ minimum. Treat a patio as you would a room in a house.
- Lawn: at least 8′ wide. Lawns smaller than 8′ wide are hard to irrigate and maintain. If you want a lawn for sports play, try for a minimum size of 30’x30′.
- Vegetable Garden: 4’x4’ minimum. The size of this varies depending on your desires, but it’s always a good idea to start small and then grow larger.
- Pathways: 2.5-3’ minimum. Most pathways need to accommodate easy circulation and the transportation of things like wheelbarrows. Major pathways should be at least 4′.
- Planting Beds: 3’ width minimum. A planting bed needs to provide enough space for the plants. Very few plants will be easy to maintain in a planting bed less than three feet.
Three-Dimensional Composition
Gardens are not flat. Spatial composition includes vertical elements like walls, canopies, and layered plants. Take some time to consider the dynamic nature of your design and how it functions in three-dimensional space.
Iterate & Verify
Create multiple concept designs. I usually do a minimum of three completed concepts for each design, but you can easily do more. Keep exploring until you are happy with the layout. You can borrow different ideas from different concepts and combine them as you go. Multiple iterations allow you to increase creativity and create better design solutions.
You also want to verify that your concept will work. Walk the site with your plan, and check that things make sense on the ground. You can also use photographs to check your design. Consider all four seasons, changing weather patterns, and sun angles. Other common problems can be slopes, utility access, light exposure, and soil type.
Walking through your concepts will help optimize your design. Double-check that your design is functional and will truly meet your design goals.
Refining
Early concepts can be rough and vague. Focus on the layout first. After you have a good layout, you can start refining the outline: the form and composition. It can include straight lines, curves, angles, arcs, and circles, often used in combination.
Choose a dominant form, like circles or straight lines, and repeat it throughout the landscapes. All composition types can be useful when designing, but combining too many different forms together can result in a jumbled landscape.
Avoid tight corners, sharp angles, and complex lines. Try for simple, elegant shapes that are easier to maintain and function.
Next Steps
After you have completed a final concept design, you might find that you have all the design details you need to start working on the site. If you want a more detailed design, continue on to the next step.
