After the previous stage, the basic layout of the design is established. This stage involves adding details to that design, resulting in a final, accurate landscape design. By the end of this stage, you will have a scaled plan that is ready to be built.
Draw this final landscape design with accurate measurements. Common tools for drafting include hand-drawing with graph paper or an architect’s or engineer’s scale. Hand-drawing is easy to learn, but hard to edit. Drafting on a computer, or computer-aided drafting (CAD), is also an option. CAD programs are easy to edit, but can be expensive and challenging to learn.
SketchUp is a good program to consider: it has a free version that isn’t too hard to learn and includes 3D modeling capacity. Another option is to use a hybrid computer program that resembles hand-drawing but still includes accurate measurements similar to CAD. They can be easy to learn and edit, and include options like Concepts App and Morpholio Trace.
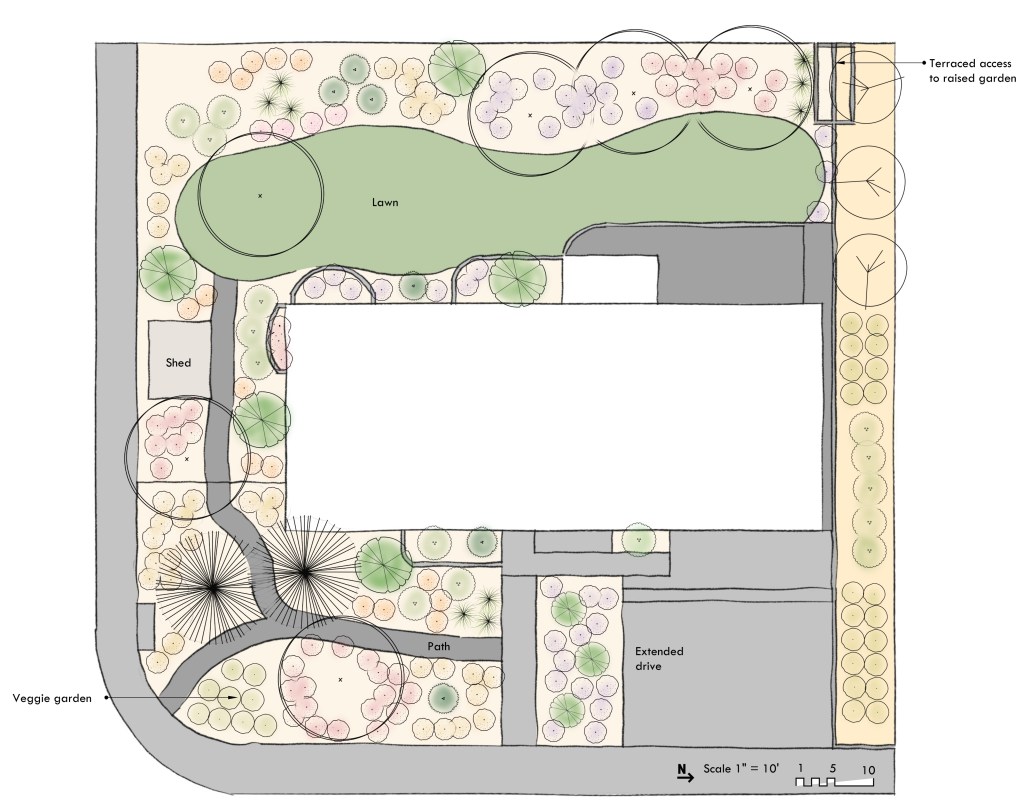
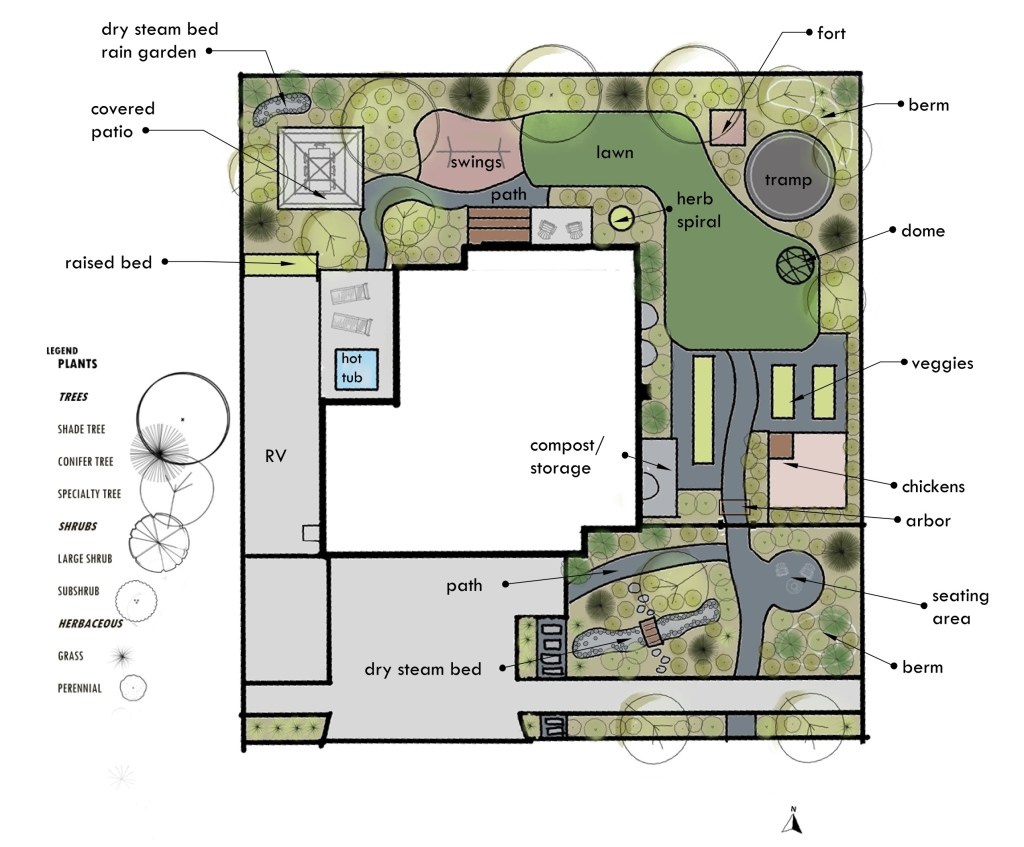
You can include all the elements listed below on one large plan, or create a series of plans. I find it useful to do a base plan that shows the overall design, a detailed plan of the hardscape and groundplane that includes materials and dimensions, and a planting plan, which will be discussed in the next stage.
Scale and Draw Components
The concept plan is meant to be rough. The next step is to take that plan and draw in the components with accurate measurements and shapes, reflecting what will be installed on the ground.
Take time to size components correctly. Some minimums were talked about in the last stage: be sure to follow them. It’s easy to undersize components, especially things like planting beds, storage areas, and patios. Consider what you are going to put in place and ensure it will fit comfortably and allow room for circulation.
For example, a standard picnic bench is six feet long and wide, including benches. Allowing three feet of circulation around the table means that a patio designer solely for the picnic table would need to be 12’x12′.
The graphic quality of this plan depends on your needs. As a landscape designer, I often deliver professional, high-quality graphics, but this level of finish isn’t necessary. Adding color, varied line-weight, and textures can improve legibility and be a fun exercise in creativity.
Grading and Drainage
Professional grading and drainageplans are created using contour lines. This process is complex, and detailed grading and drainage plans are best left to landscape architects or civil engineers.
For a simpler design, you can use arrows and notes to indicate slopes and drainage patterns. Slope is the vertical change (rise) over the horizontal length (run). You can estimate slopes in your yard using a measuring tape, a string, and a level. (If you do a web search, there are many tutorials available.)
Slope water away from structures. If this isn’t possible, add a drain. After the run-off is diverted from structures, direct it into areas such as a rain garden, swale (ditch), or planted area. This allows run-off to infiltrate naturally and remain on-site, preventing erosion and flooding.
Balance the amount of area that sheds water, like hardscape and structures, with areas that absorb water, like planting beds. A good target is to have at least as much water-absorbing area as water-shedding surfaces. Excessive hardscape without enough areas to absorb the water can lead to drainage problems. Rain gardens are one of the best ways to absorb extra runoff. For more information on rain gardens, including proper sizing, visit the Rain Garden Alliance.
Here are some specific recommendations for slopes:
- Slopes should not exceed 50%
- Lawns should be less than 25%
- Pathways should average about 10%
- Accessible pathways need to be below 5%.
- Proper drainage away from structures should be a minimum of 2%
If you are installing retaining walls or terraces, anything over three feet tall should be professionally engineered. Retaining walls under three feet are possible to design and install on your own. Use materials that are meant for retaining walls, and follow professional installation guidelines.
Poorly implemented grading can result in complex and expensive problems. If you have any doubts or questions, consult a landscape architect, a contractor experienced in drainage, or a civil engineer.
Plants
Planting plans will be addressed with more detail in the next stage, as it is often beneficial to have a separate planting plan. For this base landscape design, you will still want to indicate the type of plants in each area. These include:
- Existing plants to keep
- Trees
- Lawns
- Kitchen gardens
- Vegetables & herbs
- Cut flowers
- Small fruits
- Fruit trees
- Food forest
- Ornamental plants
- Mixed plantings
- Annual flowers
- Perennials
- Ornamental grasses
- Groundcovers
- Shrubs
- Natural plantings
- Meadows
- Woodland and shrublands
- Forests
Group plants into areas with similar needs and maintenance requirements. One of the most important characterstic to group is the irrigation requirement, which prevents over- or underwatering different plants. Common groups can include:
- Very Low: No supplemental water or care after establishment.
- Low: Some supplemental irrigation and seasonal care
- Moderate: Regular irrigation and ongoing care
- High: Frequent irrigation and high maintenance needs
Material Choices
A concept plan shows the placement of components, but not always what those components are made of. This design stage allows you to specify the material choices and mark them on the plan. For more information on material choices, see this article (forthcoming).
Irrigation
Determine the type of irrigation desired in an area: overhead, drip, hand-watering, or none. Overhead irrigation is generally used for densely planted areas such as lawns. Drip irrigation is used for planted areas with lower density and more diversity. Drip irrigation helps conserve water by directing water to where it is needed.
For overhead systems, it is beneficial to hire a professional to design an effective plan. Many irrigation supply stores offer low-cost irrigation plans. These designs have a lot of calculations, and if you do it yourself, you will need to do a lot of research. Drip systems are slightly easier to plan: irrigation supply stores are still valuable resources to ensure good design.
Measurements
Although the drawing is done to scale, it’s best to put measurements directly on the plan to ensure accurate installation. You can add measurements to the base plan or make an additional plan that has more details.
Measure out the length and width of all key components and planting beds. Leave room for on-site adjustment. For example, you specify the width of a pathway at 4′, centered down a sideyard, without including measurements on either side of this pathway. This allows for adaptation on the ground.
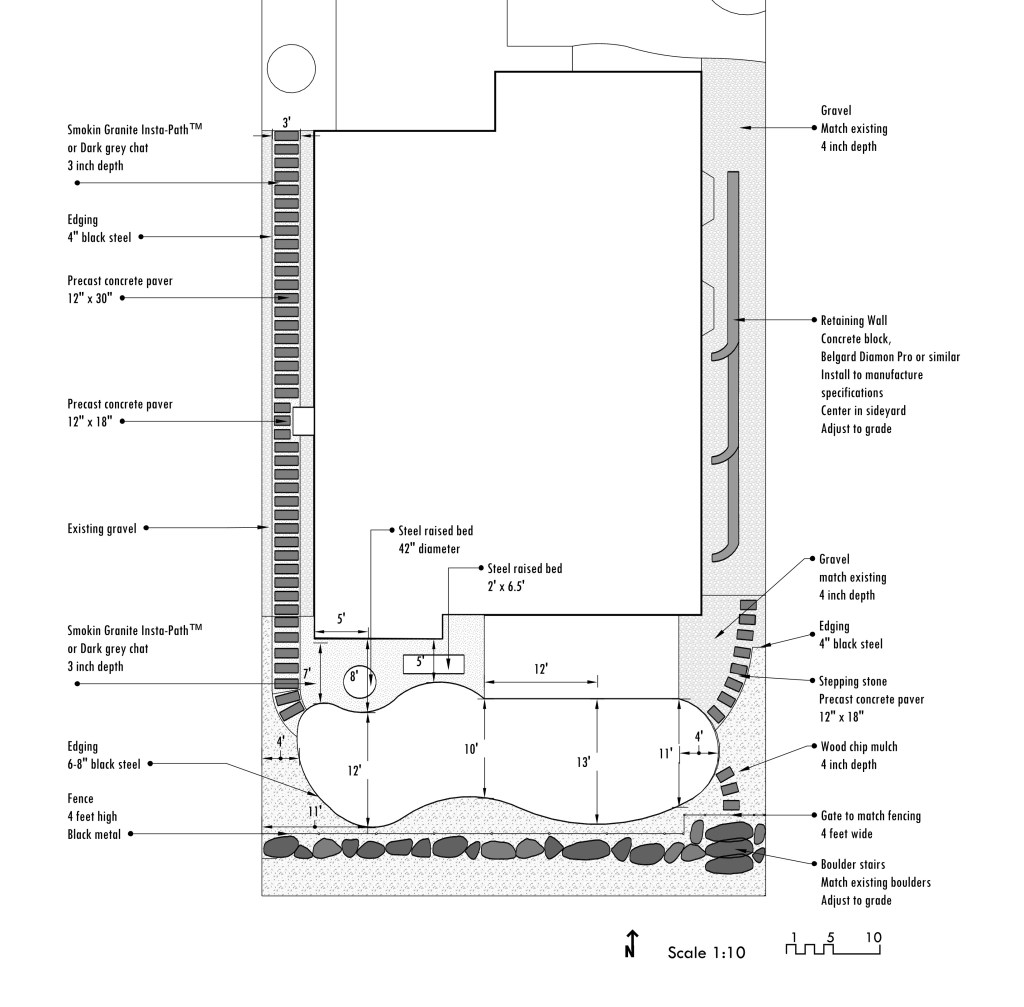
Plan Details
Some areas of the design may need more details. You can create enlarged, detailed drawings to show these areas more clearly. Section or elevation views that show a design in a straight-on perspective rather than from overhead can also be helpful. 3-D modeling can also provide a detailed look at the design, including vertical elements.
Timetable
Setting up a timetable allows progressive implementation over time. It’s easy to have more ideas than time or budget, so phasing helps facilitate implementation over time. Consider how long you want the implementation to take, and balance that timeline with available resources.
Slower implementation often leads to more manageable maintenance. New gardens typically require more intense maintenance and often have a learning curve. Implementing change over time means you can learn as you go and not get overwhelmed.
You can phase the design by project or by area, such as focusing on the front yard and then the backyard. Here is a recommended approach:
Phase 1: Establish the foundation. Focus on disruptive and critical elements, including grading, underground irrigation, large structures, and hardscape (patios, sheds, decks), soil improvement, fencing, edging, and trees.
Phase 2: Complete the bones of the design. Add smaller structures & hardscape not yet installed (arbor, raised beds, pathways). Begin initial planting, lawn, mulch, and complete aboveground irrigation.
Phase 3: Ongoing additions. Continue to add desired features and plants. This phase is usually open-ended as the garden evolves.
If you are hiring a landscaper, they are most needed for Phase 1, helpful for Phase 2, and usually not involved in Phase 3.
Cost Estimate
A good landscape can cost 10-30% of the value of the home, and landscaping is frequently under-budgeted. To manage costs, spread the project over time, and do some of the work yourself. To estimate costs, use the worksheet linked below:
