Developing a good understanding of your garden through a detailed inventory and analysis of the site.
A garden or yard is rooted in a specific location or site. This is the time to take a step back and observe that site. Inventory is the first part of this step: taking note of the features of the garden. The next part is analyzing that information to make conclusions used in the design. With a good inventory and analysis, you get to know the site to make better design decisions.
To help you with your site analysis and inventory, download the form linked below. You can use the form and this article simultaneously to help you build your site analysis.
Location
The area you are working with has a history and is located within a broader area. Understanding the history of the site can have implications on future plans: was it an agricultural area, city infill, a developed natural area, etc? You can also note the architectural style of the home: you don’t need a deep knowledge of architectural styles, just describe the vibes the architecture gives to you.
Other considerations include the neighborhood character, what kind of places are around you, the overall traffic near your home, and anything that helps describe the surrounding location. This helps ground the project in a broader space.
Base Map
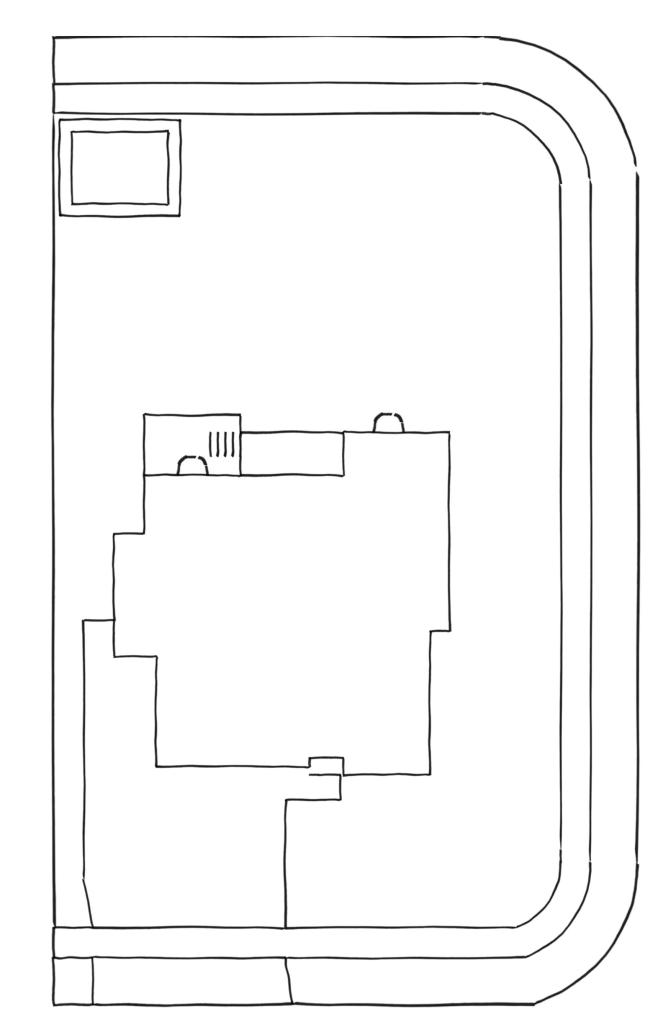
It is important to have a scaled map of the site. You will use this now, as well as the basis for design later. Sometimes these are available from the developer of the property, the county planning office, or from a survey done of the property. You can make one using aerial or satellite imagery or by measuring on the ground and drawing one. A basic site map includes the property lines, major buildings, and hardscape like driveways and patios.
The needed accuracy of a scale drawing depends on the eventual goals and changes to the landscape, along with your own desires. If you are planning on building structures, especially along property setbacks or slopes, you may need an accurate scale drawing. This can be obtained by hiring a survey team or similar service. For many landscape design, precise accuracy is not needed, as the landscape design can allow for flexibility in dimensions.
Site Inventory
Add what is existing in your yard to your site map. Make this on a copy of the original site map, or on a trace paper overlay. You don’t have to include the things that you are planning on removing, like the juniper relic from the 50’s, but it can be useful to include them to determine the changes to the landscape. Note the status or health of each item. For a complete list, see the PDF linked above.
Structures
Include the details of the structures you put on your site map, such as windows, doors, and layout. This can help with making a design that connects to the home. You also want to mark down existing outbuildings, hardscape, fences, planting beds, utility lines, and other structures. Make a note if they are in good condition, or if they need any type of work or even removal.
Topography
Topography deals with the slopes that occur on the site, which also affects how water runs off across the site. Draw any retaining walls, and overall slopes. Look for extra water at low spots on the bottom of slopes, erosion that might be occurring on steep, unprotected slopes, and the way water flows across the landscape during heavy rain. Topography is professionally marked with contour lines; however, to keep it simple, just use arrows and words to mark slope directions.
Traffic
Pay attention to the people who go through and next to your landscape. This can include you, your family, those you live with, friends, neighbors, and even other community members like delivery drivers, and people walking or driving by. Mark these pathways, including the normal ones, like where people drive and park cars and walk. Some pathways will be existing, but others will be desire paths: pathways that aren’t formal, but are commonly used anyway. You can mark traffic with lines, using thicker or multiple lines for high traffic pathways, and thinner lines for less-traveled paths.
Plants & Natural Features
How plants grow will help you understand the site. Are plants healthy, or seem to struggle? Do native, cultivated plants, or weeds dominate? When you are observing the plants, try to look for reasons they are thriving or struggling. This might include many of the factors that are on this list.
Wildlife
Wildlife can include anything from tiny animals like insects and spiders to small animals like birds, reptiles, amphibians, and small mammals, and also larger animals like deer. Keep in mind that wildlife patterns change throughout the season.
Soil
What is the appearance of your soil? Is there a lot of organic matter, and does the soil look healthy, or appear to have problems? Are there areas that are compacted and disturbed, or areas of undisturbed soil? This will require some digging, and note that soil can differ across a property.
The best way to determine soil characteristics is by collecting and testing it at a soil lab. Contact your Extension office for information about a local soil lab. Online options are also available. Kits are sometimes available at nurseries for do-it-yourself testing: but I recommend sending it to a lab. It generally costs about the same, and the results will be more accurate from a soil lab. Look for a soil test that checks for texture, pH, and phosphorus and potassium levels.
Texture: the texture of the soil will be a combination of sand, silt, and clay. An equal combination of all three properties is called a loam.
pH: pH is a measure of acidity. Most soils are neutral (pH 7) to acidic (down to pH 4).
Phosphorus and Potassium: Soil tests will measure the amount of available nutrients and indicate if they are low, adequate or high.
Other properties to note about the soil include topsoil depth and general appearance. It will take some digging around to see what is under the ground. Soils have profiles and layers within the profile. If you dig at least two feet deep in several areas, you can determine what your soil looks like below the surface. This can help determine if there is compaction, damaged soils, or any other soil disturbance.
Drainage can also be tested. Many methods are available: it usually involves filling a hole up with water and allowing the water to drain out. If it happens rapidly, the soil has good drainage. If the water stays around for a long time, drainage is poor.
Irrigation
Irrigation primarily falls into one of four systems: overhead, micro, flood/furrow, or hand. Overhead irrigation is the most common. Irrigation lines are typically buried with pop-up sprinklers and are attached to an automatic controller. Overhead irrigation is usually used for areas that need a broad application of water, like a lawn.
Micro-irrigation is also referred to as drip irrigation. Pressure for this system is much lower and is usually delivered via flexible poly-tubing that is above or slightly below ground. Emitters can deliver water through drip, small sprays, or soaker tubing. Micro irrigation is commonly attached to an automatic controller. Micro-irrigation is commonly used in mixed planting beds, including irrigating trees, shrubs, flowers and vegetables.
Flood/furrow irrigation is uncommon in residential systems, but still can occur. Water is usually diverted from a stream or irrigation canal to enter the property. It is allowed to flow naturally or through directed channels. This system is commonly seen in agriculture, but can still occur in older residential neighborhoods.
Hand irrigation is any type of irrigation done without a controller or schedule. The only requirement is a hose and spigot. It can include lawn tractors, manual sprinklers, rain wands, soaker hoses, etc.
For overhead irrigation systems, determine the functionality of any existing system by performing a water check. (see here) For any system, run it and observe how it performs.
Also, note the water source. Culinary water is water that is safe to drink. Water coming from the house is culinary water. Secondary water has not been treated and is not usually safe to drink. Secondary water can come through a separate pressurized system, a well, stream, irrigation canal, rainwater harvesting, or from greywater systems. When noting the water source, also note how much water is available, pressure if applicable, season of availability, and any other potential issues.
Climate
Researching your basic climate data is helpful. You can look up broad climate data, like your Köppen climate classification (here’s a useful map), as well as specific data like annual rainfall, low and high temperatures, including the USDA hardiness zone, and the first and last frost dates. This data is often available from your local Extension service or from online weather sites.
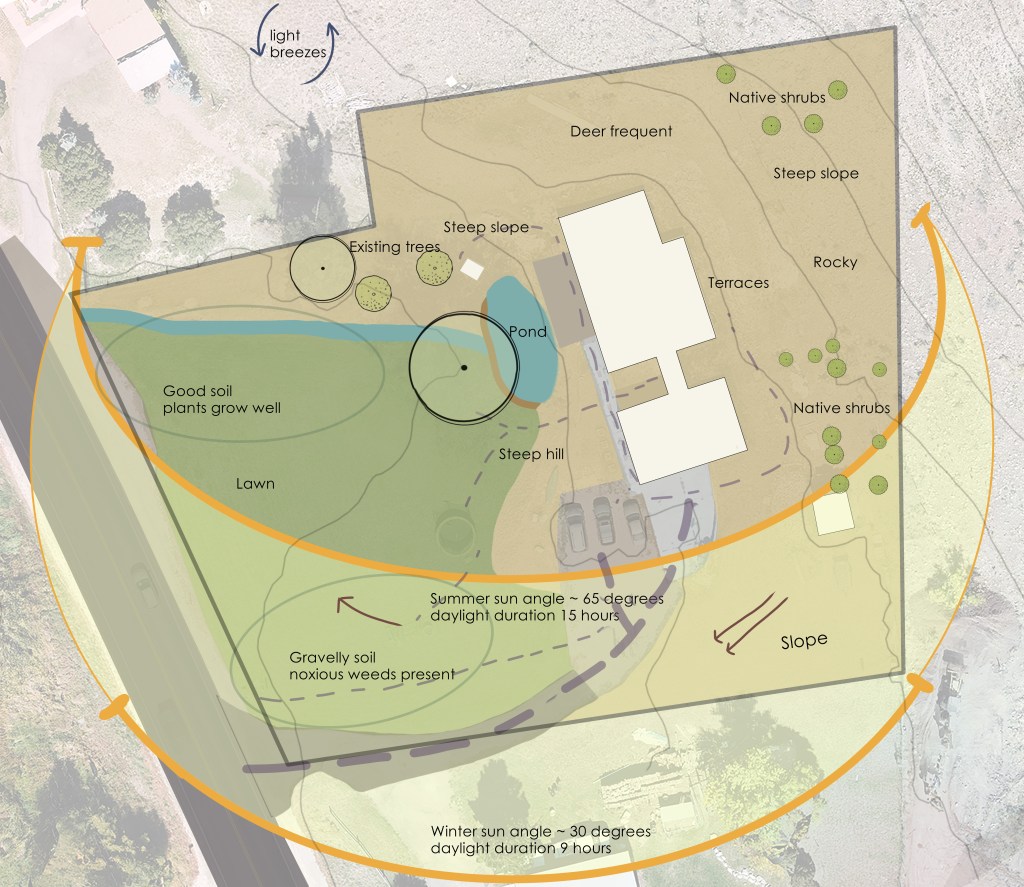
Additional useful data includes information on how weather and climate affect the site. Look for microclimates: areas that differ from the surrounding overall climate. These areas might be sheltered from winter storms, areas that are harsh and unprotected, areas that are sunny or shady, or cooler or warmer.
The sun has a huge effect on how plants grow. Look at natural sun patterns, and keep in mind that the sun angle changes throughout the year. You can use an online tool to visualize sun angles throughout the seasons. Not the sunny and shady areas of the landscape.
Wind is also something that is valuable to pay close attention to. Looking at the lean of trees can help get a general wind direction. Also, notice large events and their frequency.
Finally, keep in mind that there can be risks from extreme weather events and similar hazards. Is there risk from storms, fire, floods, or other hazards?
Analysis
Observations
Spend time in the garden doing nothing but watching, listening, and exploring. Watch the flow of water, weed growth patterns, and dig around in the soil just to see what is there. Discover the garden’s strengths and weaknesses, and what you love and hate about it. Even a blank-slate garden that might simply be a bulldozed patch of dark still has slope, soil, and surrounding features.
Observations can be compiled onto a map of the property, or they can simply be written down. For instance, write down things like:
- Not a lot of plants, weeds, or otherwise, in the back corner of the lot
- I love the view to the east.
- I don’t like the look of the hedge.
- We are always using the hill as a pathway and even riding a bike down it.
There is a lot you can observe, just keep your eyes open. Observation should also be ongoing: it’s not a one-time thing, but something you can do at any time, and across multiple seasons.
Requirements
Each site is subject to a range of requirements: these include things like city landscape ordinances, HOA rules, setbacks, easements, and even responding to the desires and requirements of neighbors. Take note of these restrictions.
Issues/Weaknesses
Many problems might have been noticed earlier in the site inventory. In this analysis phase, clarify these issues. Define what changes you want to make in the site, and what obstacles could be a challenge. These can include things like creating a screen from neighboring problems, dealing with pests and weeds, planning for natural disasters, and addressing any safety concerns.
Highlights/Strengths
This is the opposite of the previous analysis: take note of what things you like. This can include favorite areas, good views, good soil, and any advantage the site brings.
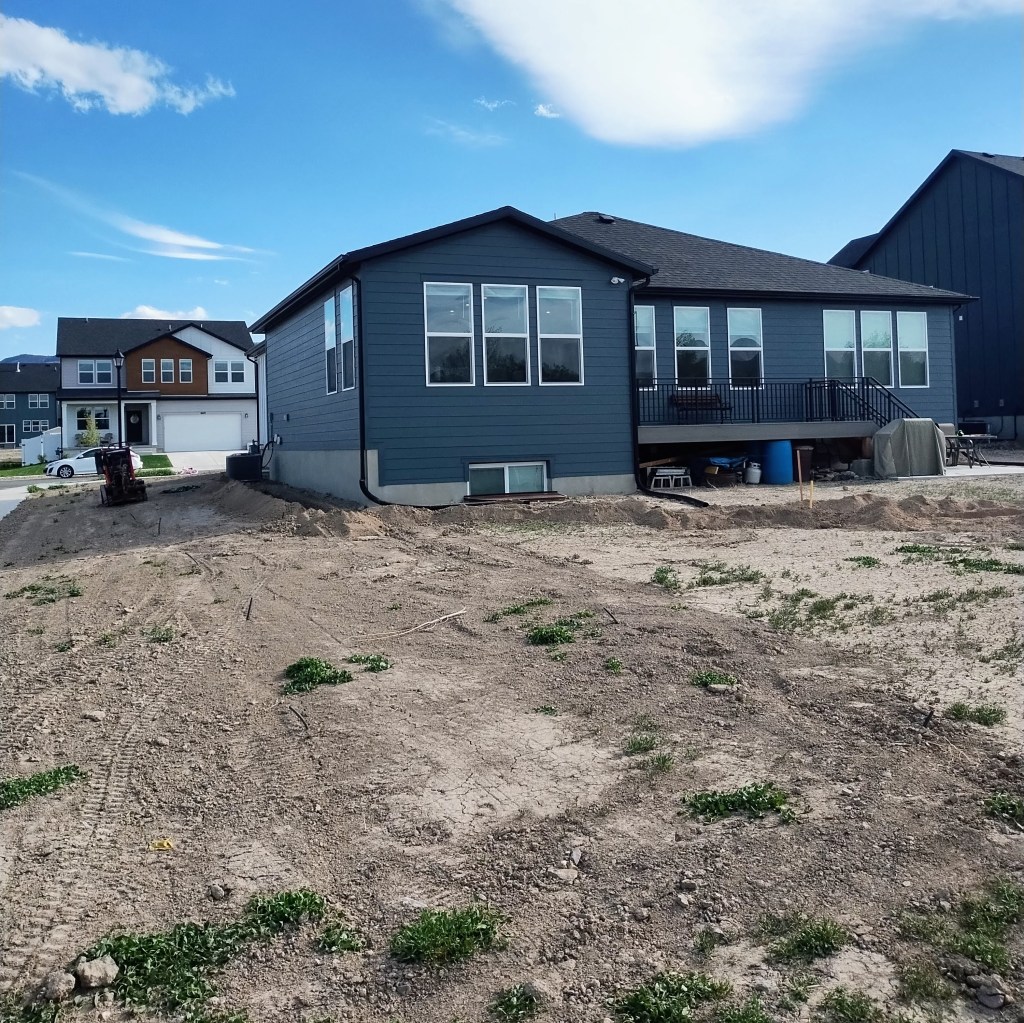
Before Pictures
Taking pictures at this stage is valuable for both design and tracking progress. Takes lots of pictures of a variety of views. Take wide views of all sides of the house and look out from the house toward property lines. Include closer shots of things of interest. I usually find I wish I had taken more picture: it’s easy to miss things. Go overboard and take a lot of pictures, both now and throughout the seasons.
Now you should have a good understanding of your site, complete with a base map, inventory, analysis, and before pictures.
